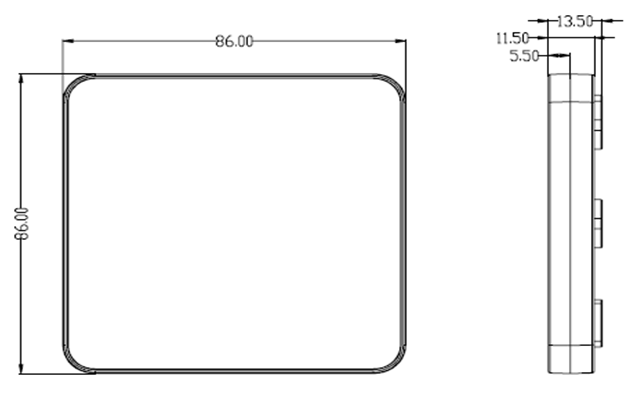
TA65-FC — 2 pipe Fan Coil Wi-Fi Thermostat
CAUTION:
- Turn off all electrical devices (e.g. heater, cooler) that are connected to the unit before installation and maintenance.
- The installer must be a trained service personnel
- Disconnect the power supply before maintenance.
- It must be mounted on a dry clean indoor place.
- Do not expose this unit to moisture.
- Do not expose this unit to dipping or splashing.
Introduction
TA65 is a controller that controls fan coil system to maintain room temperature at a desired level.
Changeover sensor is required to install when auto changeover is used.
Feature List
- Voltage supply: 230Vac
- Temperature display in oC or oF
- Temperature measurable range : 0 – 50 C
- 2-pipe system
- Manual changeover or Autochangeover can be selected
- Selection of Heat/Cool
- 7days/5+1+1days,1day program, no program.
- EEPROM stores all settings
- Adjustable control span
Wiring
NOTE: Power supply of TA65 is 230Vac.
| Terminals | Device |
|---|---|
| L | 230Vac Live |
| N | 230Vac Neutral |
| Qv | Changeover valve |
| Q1 | Fan Low |
| Q2 | Fan Med |
| Q3 | Fan High |
| T1 | Floor Sensor |
| T2 | Floor Sensor |
Pull all cables back into the wall beforehand to avoid trapping of wires. Do not use any metal conduits or cables provided with metal sheaths.
Recommend adding fuse or protective device in the live circuit.


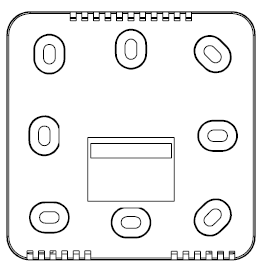
Mounting


- Wiring the terminals.
- Put into junction box.
- Mount the bottom plate of LCD board into junction box.
- Connect the wire to the LCD board.
- Assemble the Top and bottom plate of LCD Board.
LCD Interface
LCD Indication

| sn | item |
|---|---|
| 1 | Time |
| 2 | Room Temperature |
| 3 | Current Set Point |
| 4 | Temperature Unit |
| 5 | Current Program |
| 6 | Heat / Cool Mode |
| 7 | Auto Changeover |
| 8 | Output is On (when appear) |
| 9 | Fan Low/Med/High/Auto |
| 10 | Wi-Fi (appear when connected to router) |
| 11 | Mode Key: Press to internal setting 1. Long hold to internal setting 2. |
| 12 | Clock Key: Press to set clock. Hold to Program the Schedule |
| 13 | Short Press: Fan Key, Long Hold: On/Off Key |
| 14 | Up/Down key: Adjust Set point or Value of setting. |
| 15 | Blank: the area outside of the previous five keys |
Turn On/Off the thermostat
Hold ![]() to turn On / Off the thermostat. When the thermostat is Off. No Output will be activated.
to turn On / Off the thermostat. When the thermostat is Off. No Output will be activated.
Clock setting
** Nomally the clock is automatically set once wifi is connected and synchronize for each day. So manual set is not ncecssary when it is online.
- Press
 to start the setting
 - Press
 /
/  to change the day of week
 - Press again to confirm day of week setting and start to adjust hour
- Press / to change the hour
- Press again to confirm hour setting and start to adjust minutes
- Press / to change the minutes
- Press again to confirm minutes setting and start to adjust day of week
- Press [blank] to confirm or leave the clock setting. Or return after no key pressed for 20 seconds.
Clock synchronization
when Wi-Fi is connected and time synronize is need. Plesae use the App for time synchronization.
Schedule Programming
When 1 day / 5+1+1 day / 7day program is selected in internal setting.
- Hold to start the setting.
- Press / to adjust the day of week
- Press to confirm.
- Press / to adjust the time of schdule
- Press to confirm.
- Press / to adjust the setpoint
- Press to confirm.
- Press [blank] to confirm return.
Override Temperature
The Set point can be adjusted by ![]() /
/ ![]() .
.
When it is in program mode, The set point will be overrided until the next time slot.
![]() can be pressed to release the override status.
can be pressed to release the override status.
Internal parameter setting 1.
- Operation:
- Press
 key to start the setting
 - Press / to adjust the value
- Press [blank] to confirm and move to next setting
- Press
| ID | Items | Value | Default Value |
|---|---|---|---|
| P00 | User Interface Screen Saver | 0-3 | 0 |
| P01 | Screen Saver Count down | 0-120 | 20 |
| P02 | Display unit | °C / °F | °C |
| P03 | Time Display unit | 12/24 | 12 |
| P04 | Temperature Offset | -5°C - 5°C, -10°F-10°F | 0°C |
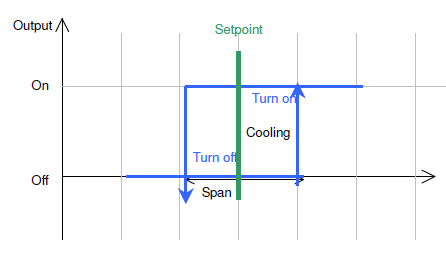
| P05 | Switching Differential Heat | 2 - 4°C, 4 - 8°F | 2°C |
| P06 | Switching Differential Cool | 2 - 4°C, 4 - 8°F | 2°C |
| P07 | Program mode | No program (0) /
1day program (1) /
5+1+1 program (2) /
7day program (3)
|
3 |
| P12 | Froce Ventilation | Disable, Enable | Disable |
| P13 | Changeover Mode | Heat, Cool, Auto | Heat |
| P14 | Changeover temperature Heat | 27 - 40°C | 27°C |
| P15 | Changeover temperature Cool | 10-25°C | 10°C |
- User Interface Screen Saver:
The thermostat will go to screen saver mode after no key for certain period.
- Mode 0: Nothing will be displayed in screen saver mode.
- Mode 1: Only room temperature will be displayed in screen saver mode.
- Mode 2: Room temperature and Time will be displayed in screen saver mode.
- Mode 3: Display all in screen saver mode.
- Screen Saver Count Down:
The count down time (in seconds) to screen saver mode.
- Display Unit:
Temperature unit in Celesius or Farenheit.
- Time Display Unit:
12/24.
- Temperature offset:
The temperature of internal sensor can be calibrated from -5°C - +5°C in case there is temperature difference between actual value and thermostat.
- Switching Differential:
The difference between switching the heating or controller on and off

- Program Mode:
- 0: No Program Mode, The thermostat control the temperature simply according to single setpoint.
- 1: 1 day program, The thermostat control the temperature according to single schedule.
- 2: 5+1+1 day program, The thermostat control the temperature according to 5 +1+1 schedule (Mon to Fri, Sat, Sun).
- 3: 7 days program, The thermostat control the temperature according to 7day program (individual program for each day).
- Froce Ventialtion:
- Disable: Fan will turn on only when heat/cool is on.
- Enable: Fan keeps on (low) even heat / cool is off.
- Changeover mode:
- 0: Heat mode
- 1: Cool mode
- 2: Auto Changeover: When changeover sensor detect the temperature above changeover heat set point. Heat mode will be activated.
- When changeover sensor detect the temperature below changeover cool set point. Cool mode will be activated.
- Changeover heating setpoint:
Paramter for Auto Changeover mode.
- Changeover cooling setpoint:
Paramter for Auto Changeover mode.
Internal parameter setting 2.
- Operation:
- Hold key to start the setting
- Press / to adjust the value
- Press [blank] to confirm and move to next setting
- Hold
| ID | Items | Value | Default Value |
|---|---|---|---|
| P19 | Clear Wifi Configuration | Yes or No | No |
| P20 | Clear Parameter setting (restore default) | Yes or No | No |
- Clear Wifi Configuration:
- When set to yes,the SSID and Password stored in the thermostat will be clerared so another SSID and Password can be set again.
- Clear Parameter setting:
- When set to yes, all Internal parameter setting will be restored to default value in next power on (reset)
Technical Data
| Power supply: | 195-250 Vac |
| Relay Contact Voltage: | 230Vac Max. 50/60 Hz |
| Relay Contact Current: | 2A Max. for each |
| Sensing Element: | 103AT |
| Terminals: | 2 sq. mm Cable |
| Operating Temperature: | 32 – 122 °F / 0 – 50 °C |
| Storage Temperature: | 23 – 122 °F / -5 – 50 °C |
| Operating Humidity: | 5-95%RHnon-condensing |