Blynk main operations
Reprinted articles: here.
Virtual Pins
Blynk can control Digital and Analog I/O Pins on you hardware directly. You don’t even need to write code for it. It’s great for blinking LEDs, but often it’s just not enough…
We designed Virtual Pins to send any data from your microcontroller to the Blynk App and back.
Anything you connect to your hardware will be able to talk to Blynk. With Virtual Pins you can send something from the App, process it on microcontroller and then send it back to the smartphone. You can trigger functions, read I2C devices, convert values, control servo and DC motors etc.
Virtual Pins can be used to interface with external libraries (Servo, LCD and others) and implement custom functionality.
Hardware may send data to the Widgets over the Virtual Pin like this:
Blynk.virtualWrite(pin, "abc");
Blynk.virtualWrite(pin, 123);
Blynk.virtualWrite(pin, 12.34);
Blynk.virtualWrite(pin, "hello", 123, 12.34);
For more information about virtual pins, read Virtual pins control.
Send data from app to hardware
You can send any data from Widgets in the app to your hardware.
All Controllers Widgets can send data to Virtual Pins on your hardware. For example, code below shows how to get values from the Button Widget in the App
BLYNK_WRITE(V1) //Button Widget is writing to pin V1
{
    int pinData = param.asInt();
}
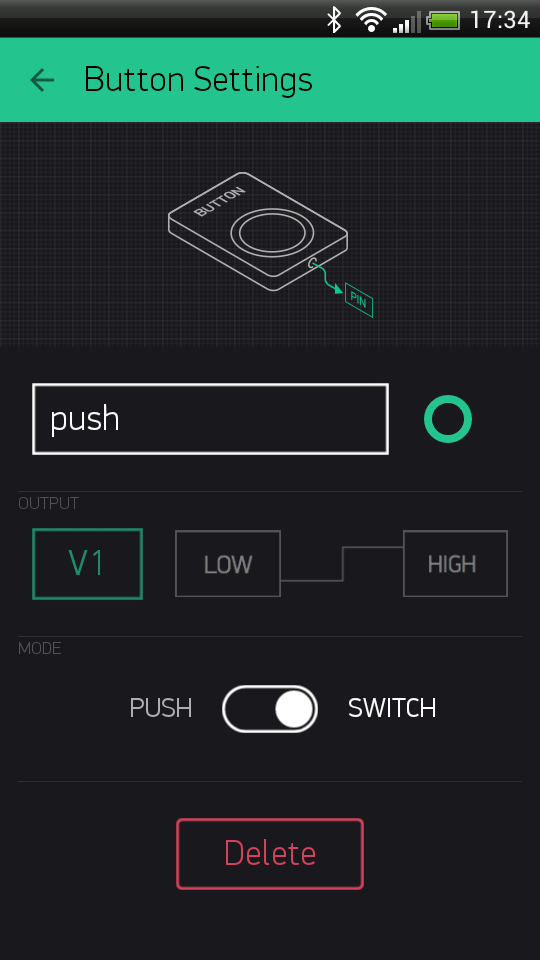
When you press a Button, Blynk App sends 1 On the second click - it sends 0
This is how Button Widget is set up:
Full example sketch: Get Data
Sending array from Widget
Some Widgets (e.g Joystick, zeRGBa) have more than one output.
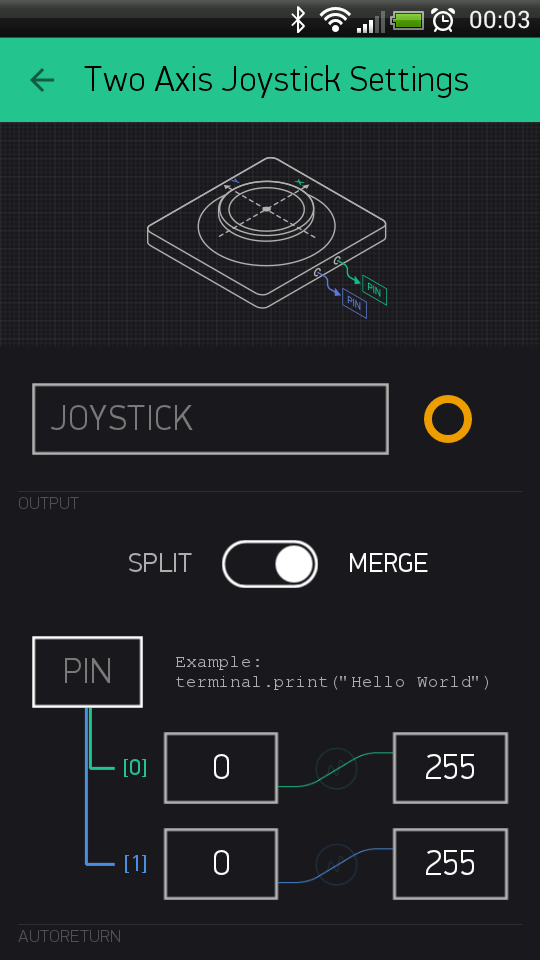
This output can be written to Virtual Pin as an array of values. On the hardware side - you can get any element of the array [0,1,2…] by using:
BLYNK_WRITE(V1) // Widget WRITEs to Virtual Pin V1
{
    int x = param[0].asInt(); // getting first value
    int y = param[1].asInt(); // getting second value
    int z = param[N].asInt(); // getting N value
}
Sketch: JoystickTwoAxis
Get data from hardware
There are two ways of pushing data from your hardware to the Widgets in the app over Virtual Pins.
Perform requests by Widget
Using Blynk built-in reading frequency while App is active by setting ‘Reading Frequency’ parameter to some interval:
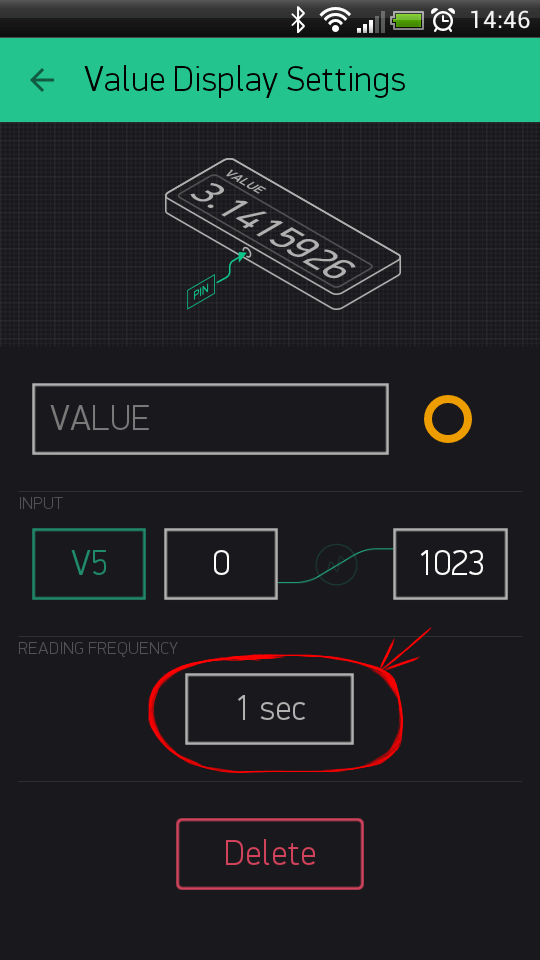
BLYNK_READ(V5) // Widget in the app READs Virtal Pin V5 with the certain frequency
{
    // This command writes Arduino's uptime in seconds to Virtual Pin V5
    Blynk.virtualWrite(5, millis() / 1000);
}
Sketch: PushDataOnRequest
Pushing data from hardware
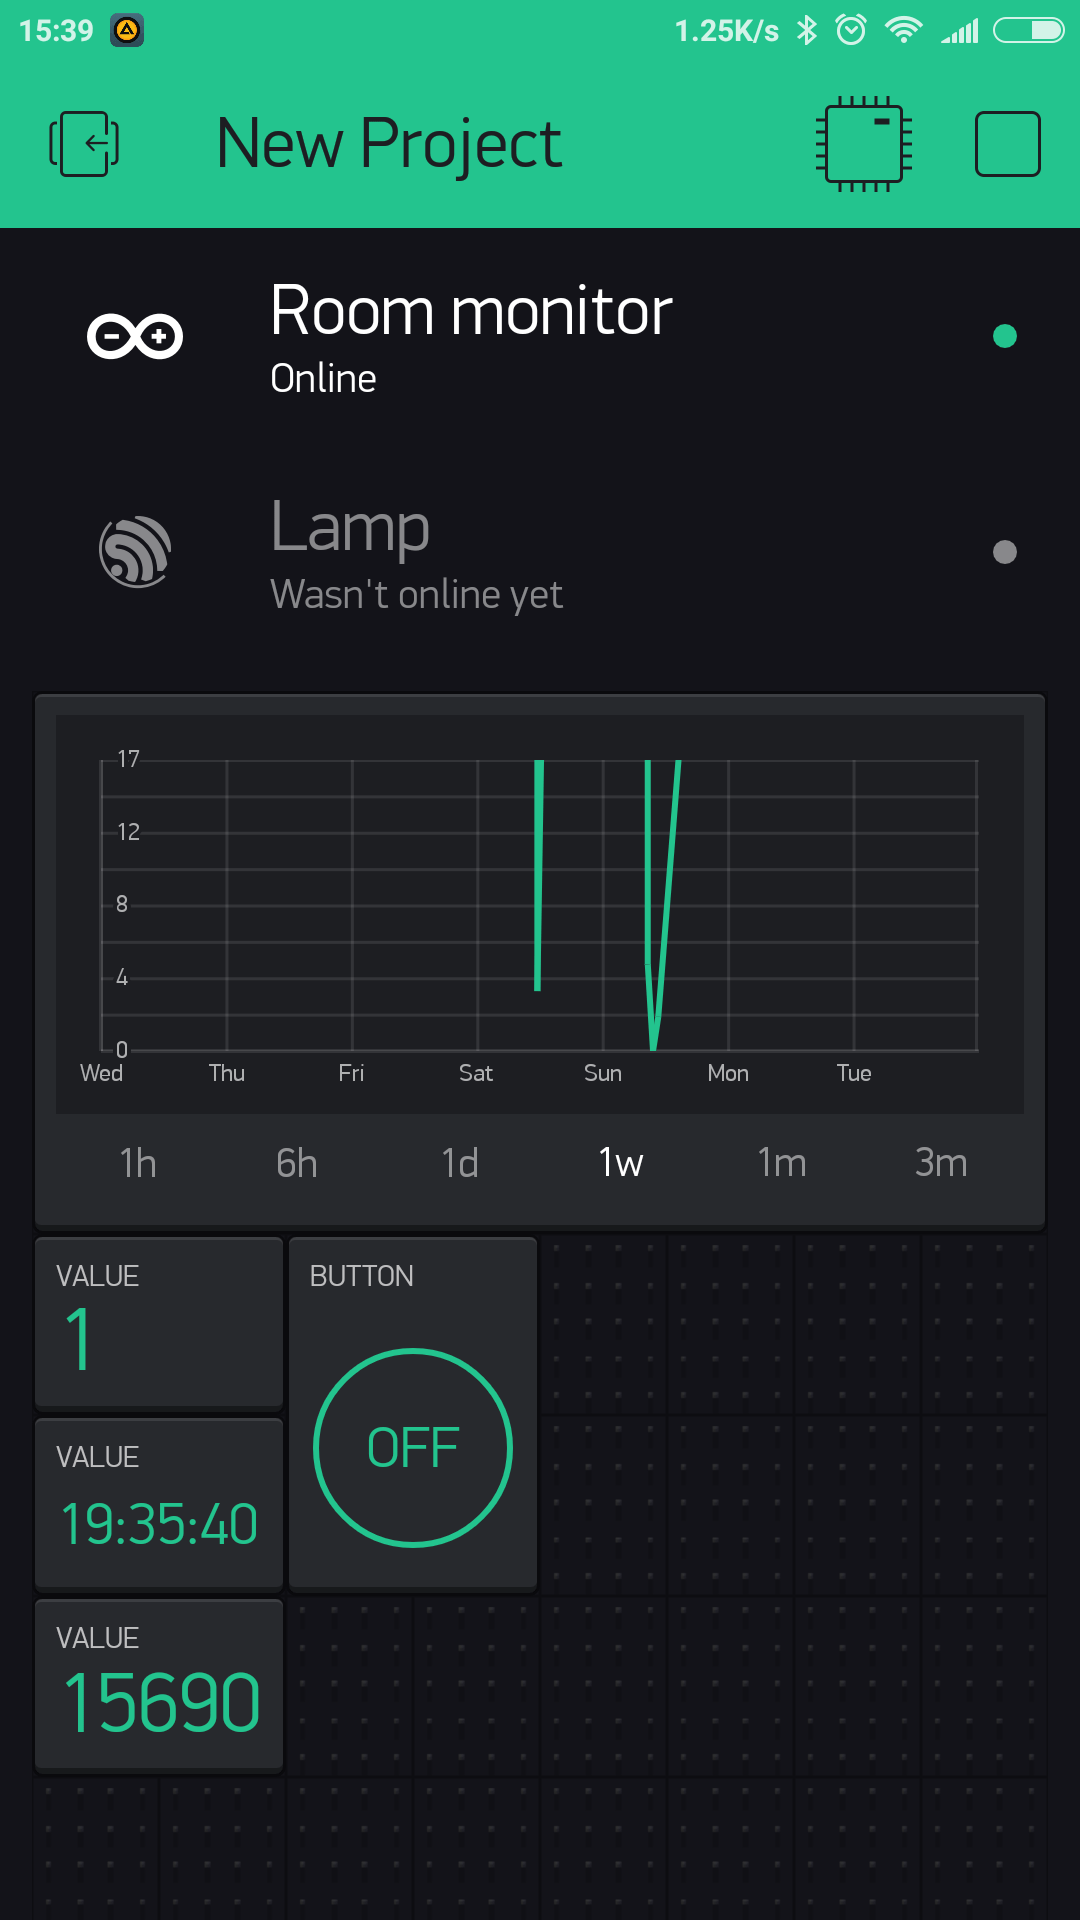
If you need to PUSH sensor or other data from your hardware to Widget, you can write any logic you want. Just set the frequency to PUSH mode. Any command that hardware sends to Blynk Cloud is automatically stored on server and you get this info either with History Graph widget or with HTTP API.
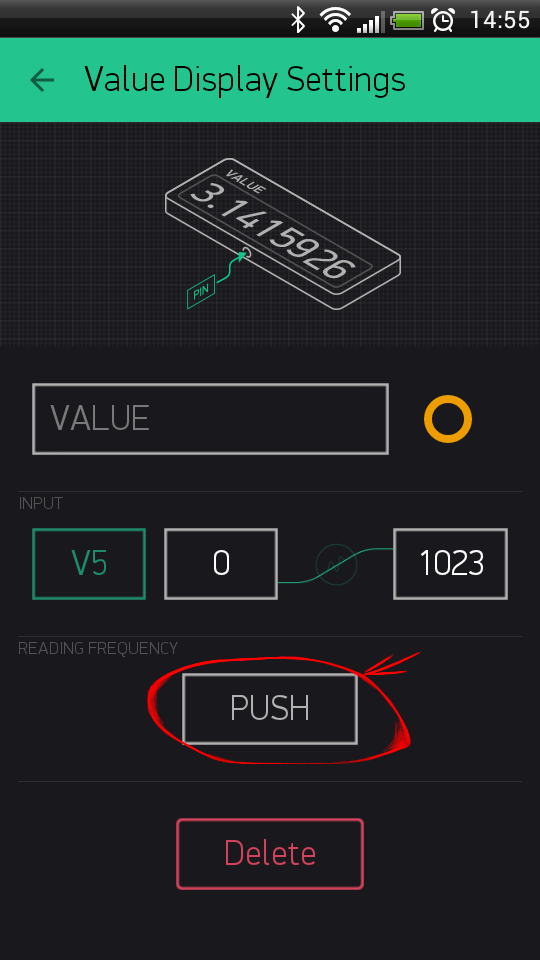
We recommend sending data in intervals and avoiding Flood Error. You can use timers like BlynkTimer. Please read instructions inside this example sketch for more details.
Here is how it can work:
#include <SPI.h>
#include <Ethernet.h>
#include <BlynkSimpleEthernet.h>

char auth[] = "YourAuthToken"; // Put your token here

BlynkTimer timer; // Create a Timer object called "timer"!

void setup()
{
    Serial.begin(9600);
    Blynk.begin(auth);

    timer.setInterval(1000L, sendUptime); //  Here you set interval (1sec) and which function to call
}

void sendUptime()
{
    // This function sends Arduino up time every 1 second to Virtual Pin (V5)
    // In the app, Widget's reading frequency should be set to PUSH
    // You can send anything with any interval using this construction
    // Don't send more that 10 values per second

    Blynk.virtualWrite(V5, millis() / 1000);
}

void loop()
{
    Blynk.run(); // all the Blynk magic happens here
    timer.run(); // BlynkTimer is working...
}
Sketch: PushData
State syncing
For hardware
If your hardware looses Internet connection or resets, you can restore all the values from Widgets in the Blynk app.
BLYNK_CONNECTED() {
    Blynk.syncAll();
}

// here handlers for sync command
BLYNK_WRITE(V0) {
    ...
}
The Blynk.syncAll() command restores all the Widget’s values based on the last saved values on the server. All analog and digital pin states will be restored. Every Virtual Pin will perform BLYNK_WRITE event.
Warning
if pin is empty and wasn’t initialized - hardware will not get any response for those pin during sync.
You can also update a single Virtual Pin value by calling Blynk.syncVirtual(V0) or you can update several pins with Blynk.syncVirtual(V0, V1, V2, ...).
You can also use server to store any value without widget. Just call Blynk.virtualWrite(V0, value).
For app
If you need to keep your hardware in sync with Widgets’ state even if app is offline use Blynk.virtualWrite.
Imagine you have a LED Widget connected to the Virtual Pin V1 in the app, and a physical button attached to your hardware. When you press a physical button, you would expect to see updated state of the LED Widget in the app. To achieve that you need to send Blynk.virtualWrite(V1, 255) when a physical button gets pressed.
Represent physical button state via LED widget with interrupts
Represent physical button state via LED widget with polling
Represent physical button state via Button widget with polling
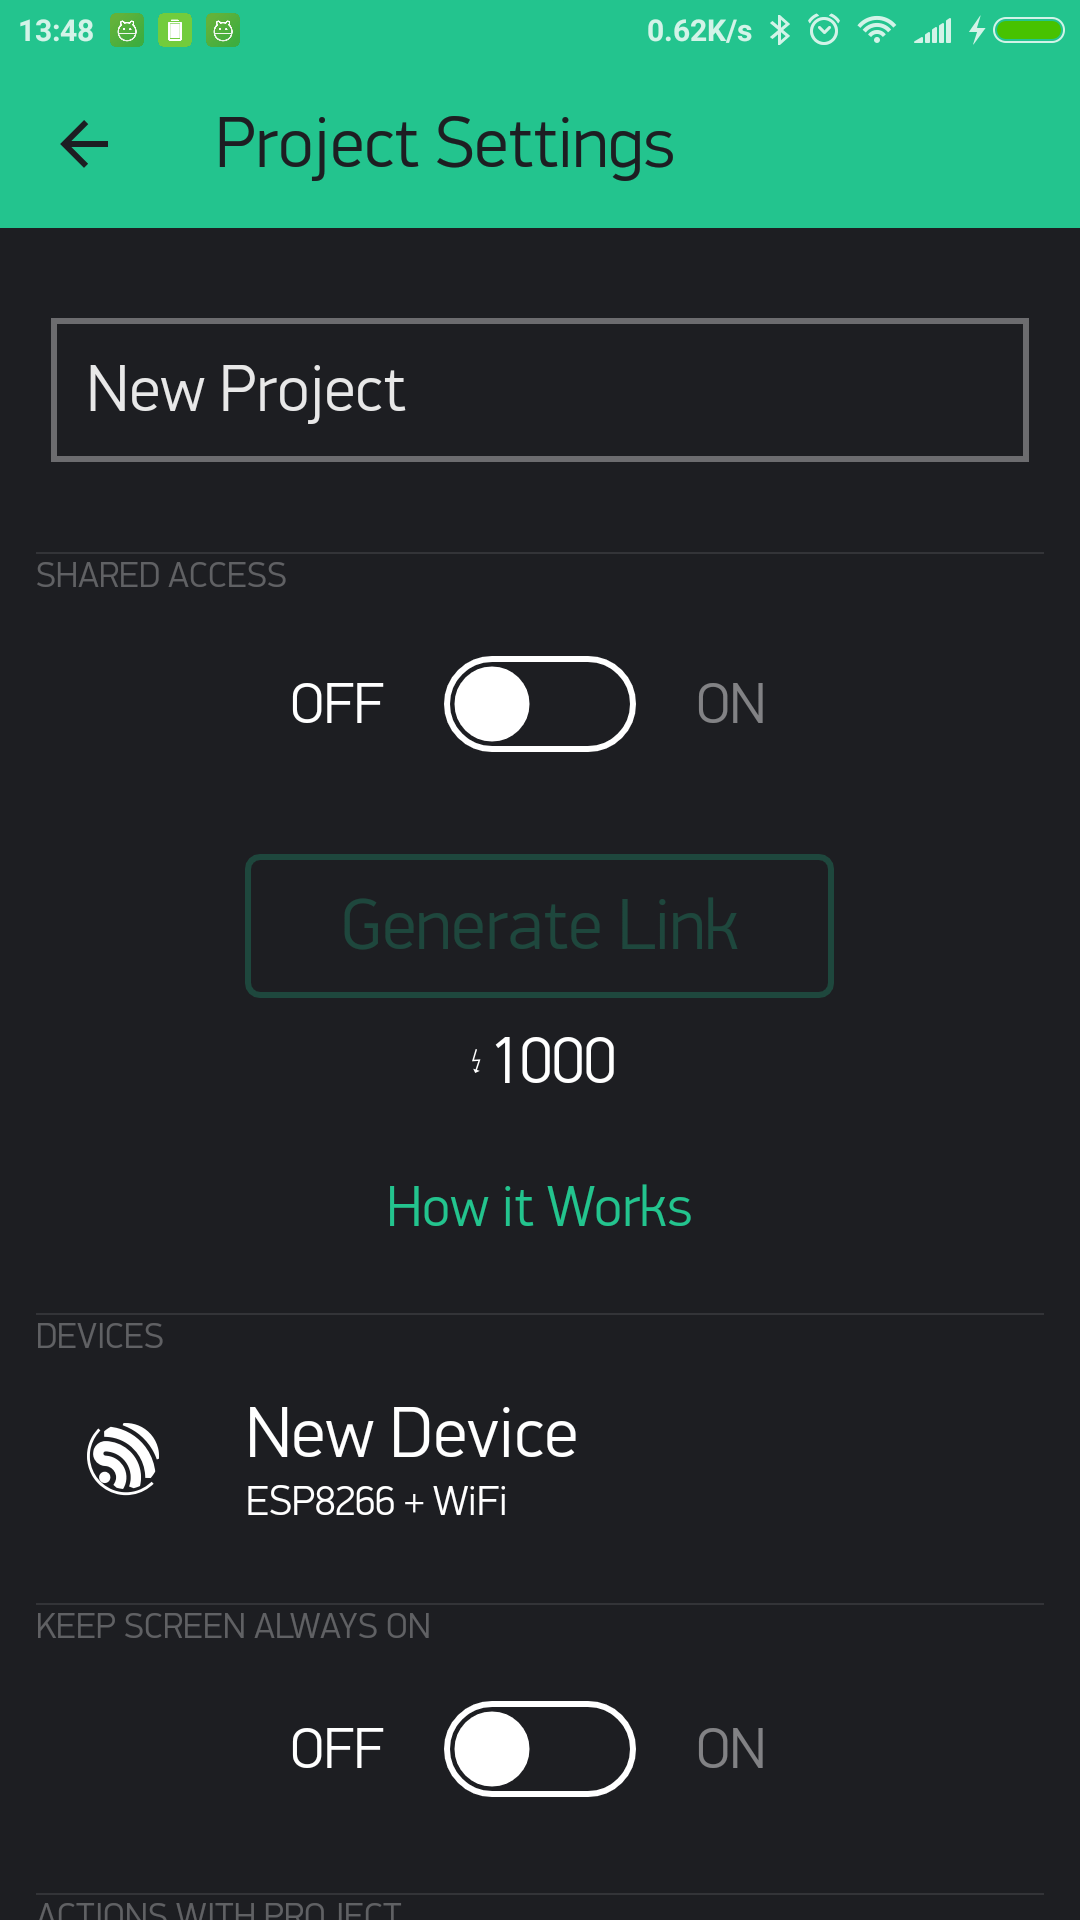
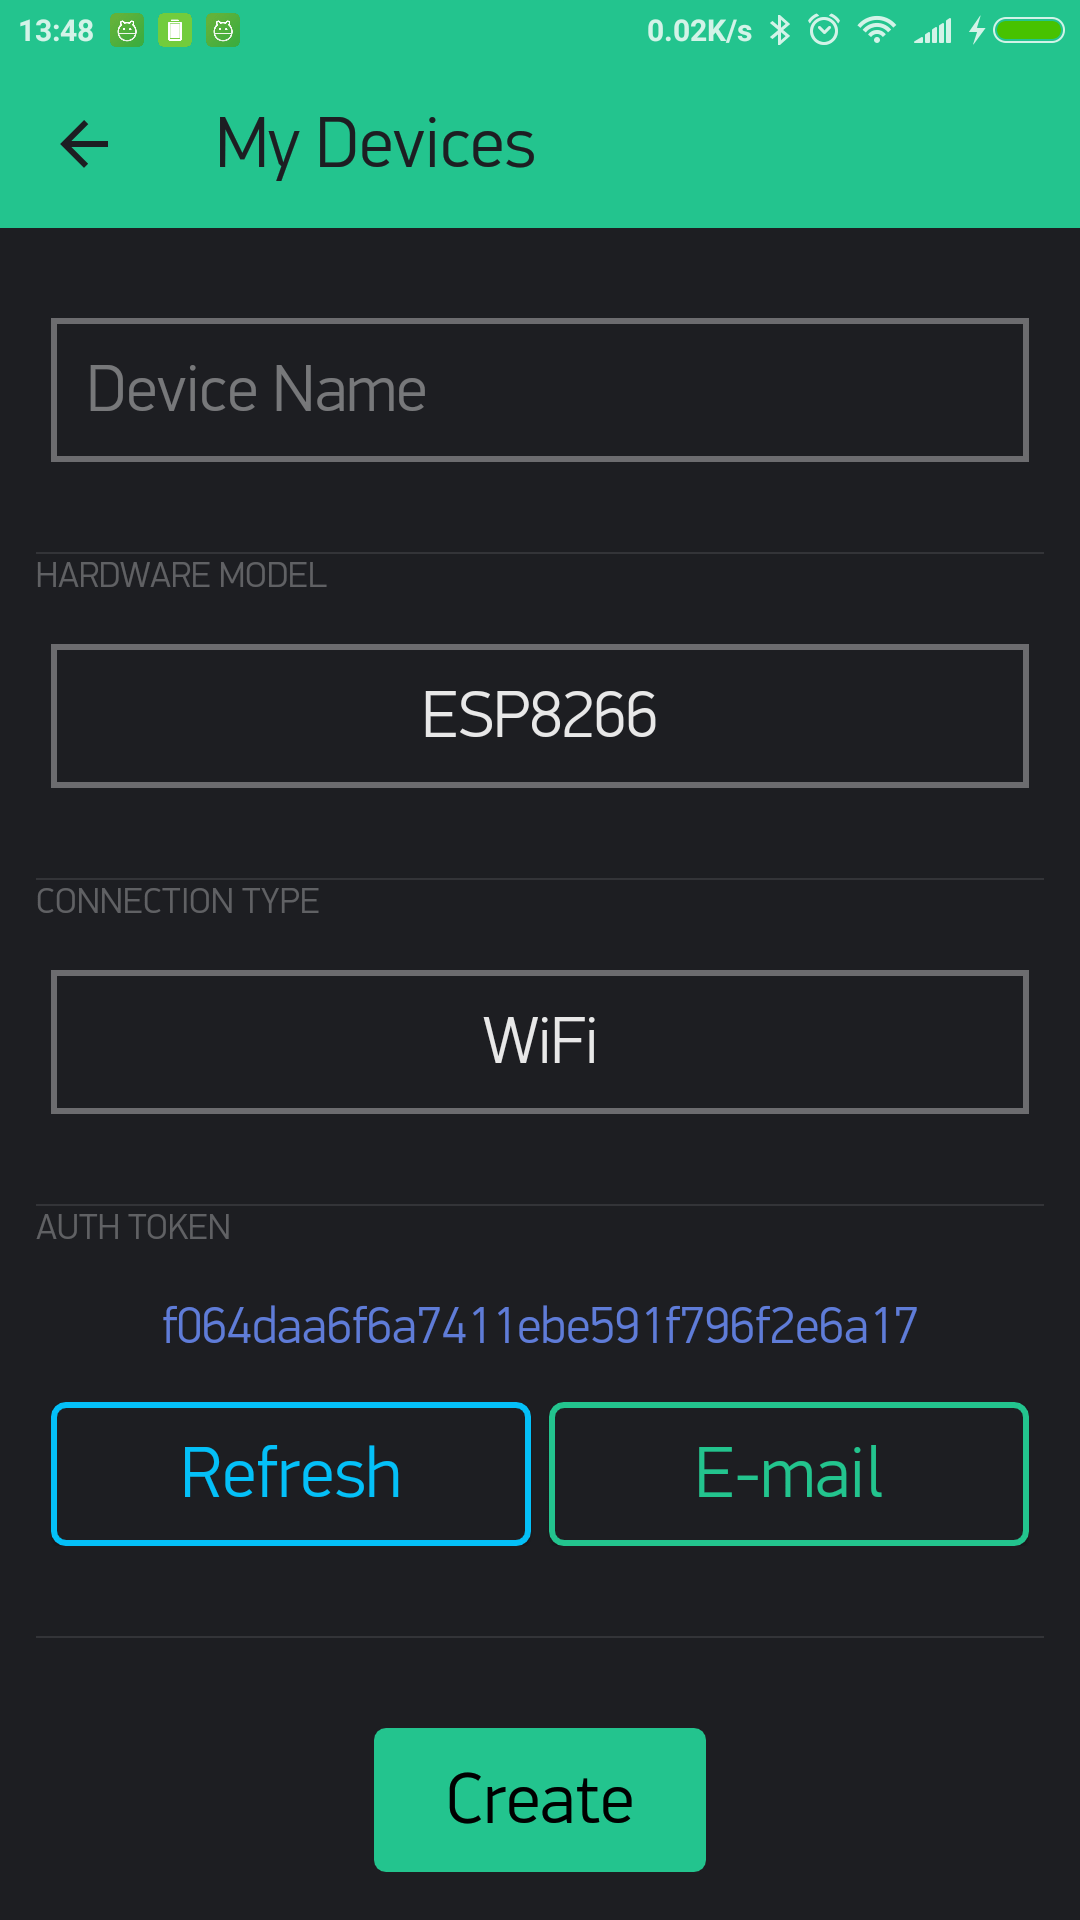
Control of multiple devices
Blynk app has support of multiple devices. That means you can assign any widget to specific device with own auth token. For example - you may have button on V1 that controls wi-fi bulb A and another button on V1 that controls wi-fi bulb B. In order to do this you need more than 1 device within your project. To achieve this please go to project settings and click on “Devices” section :
You’ll see list of devices :
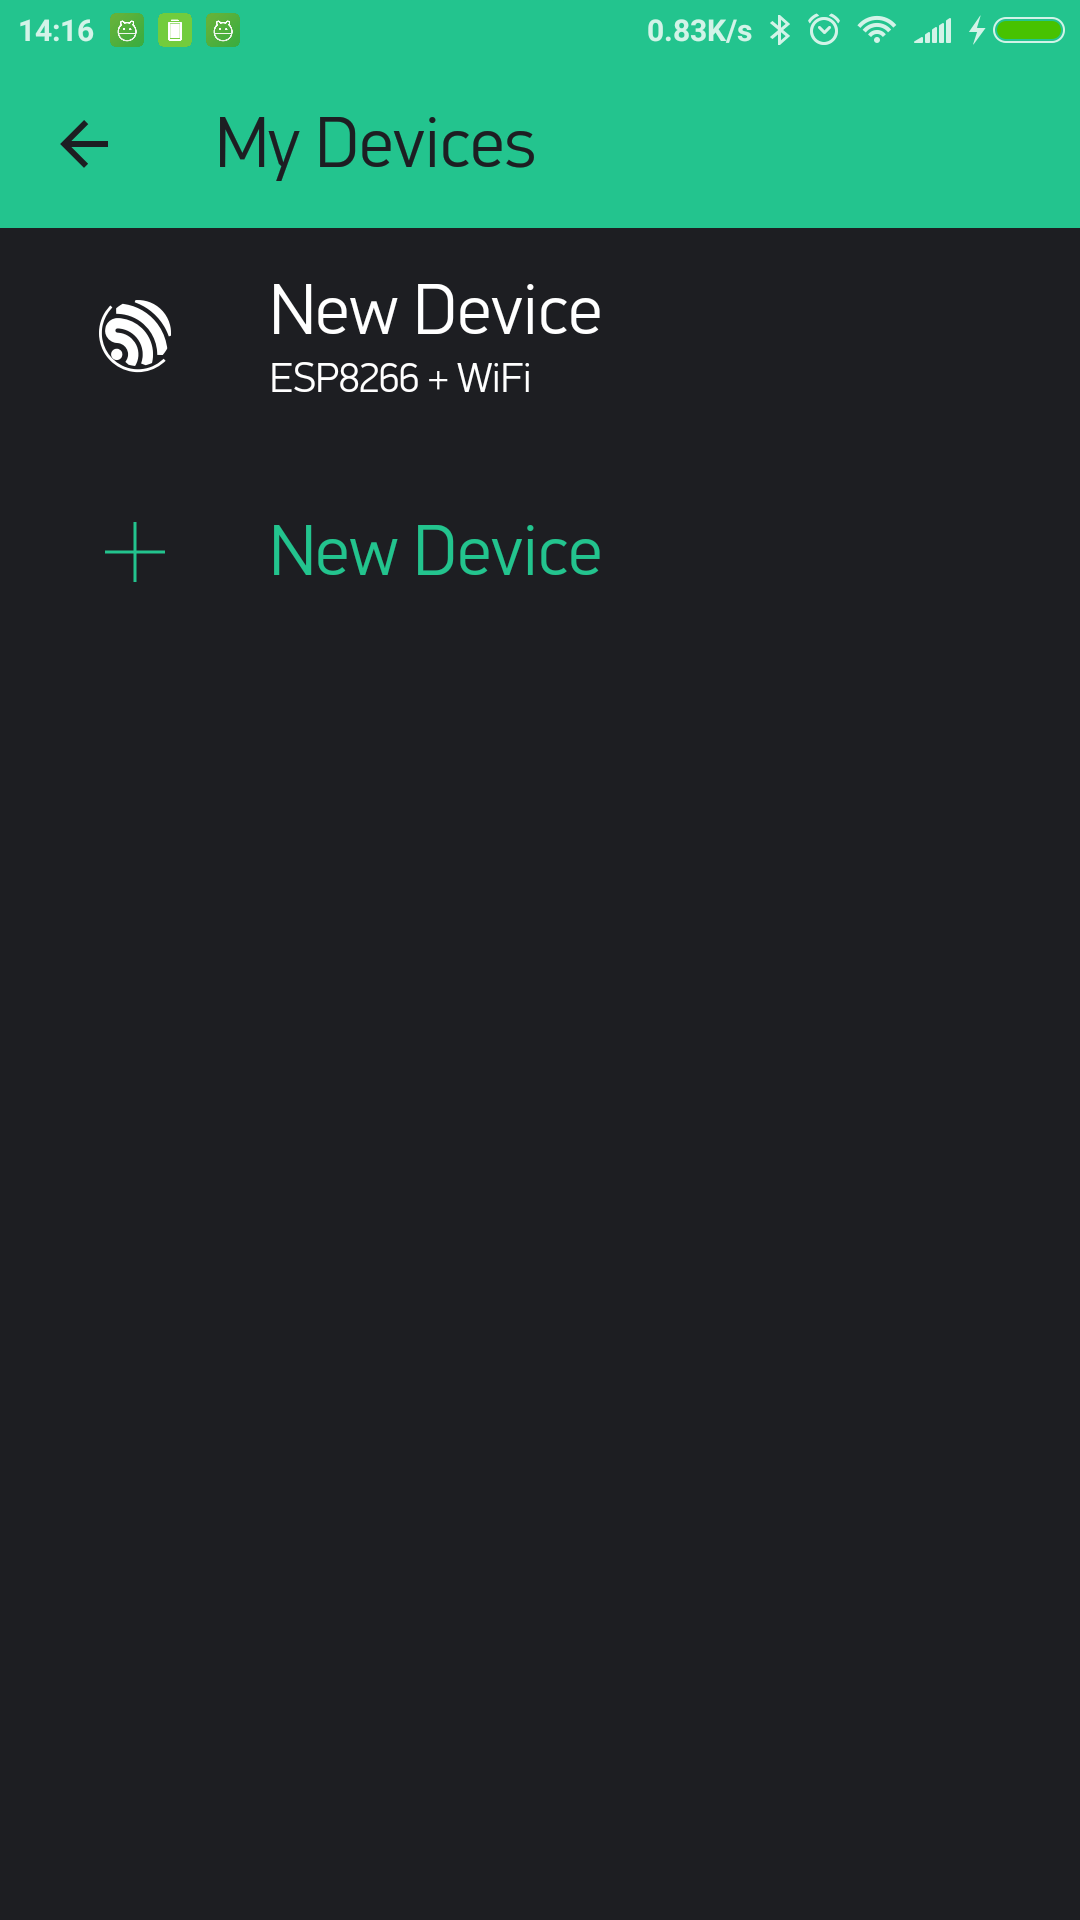
So you can add new device :
After above steps, every widget will have one more field “Target” :
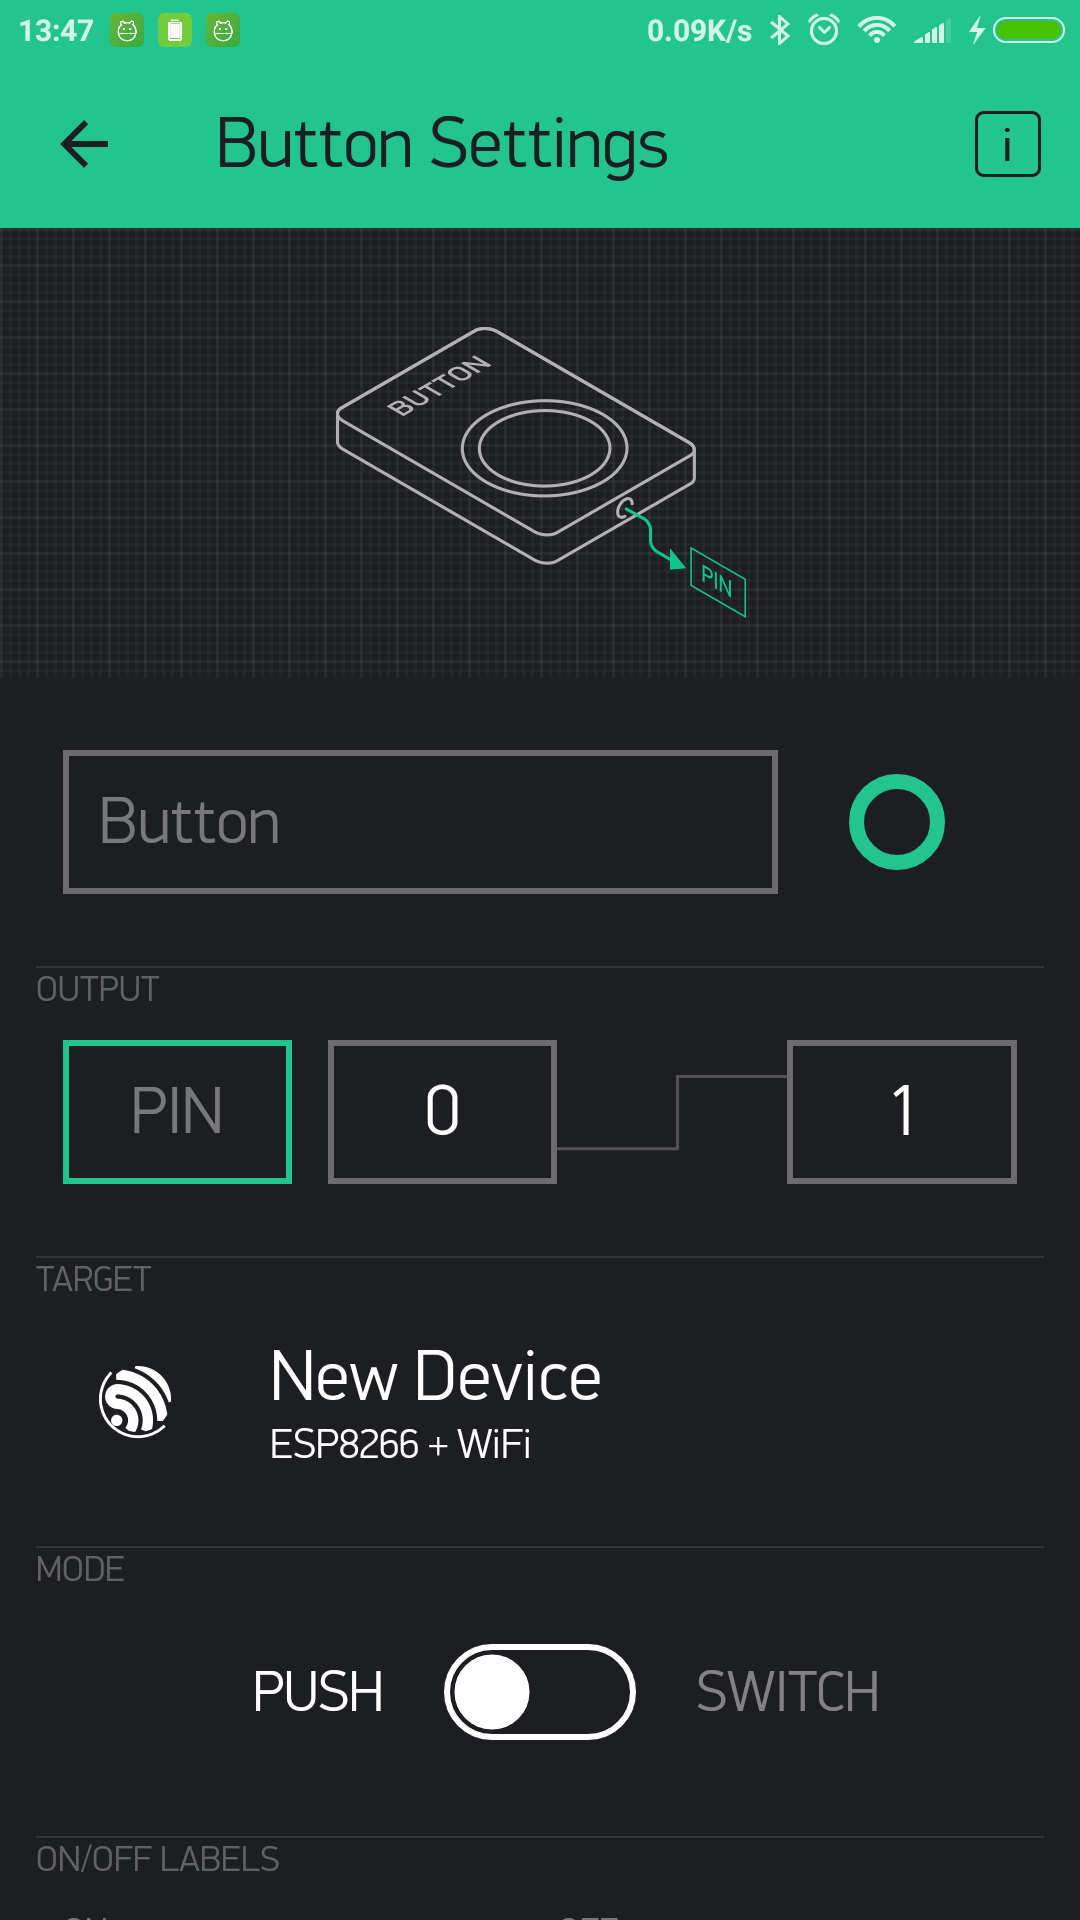
Now you need to assign widget to device and after that widget will control only this specific device.
That’s it! Now you need to upload sketches with correct Auth Tokens to your hardware.
Tags
Tags feature allows you to group multiple devices. Tags are very useful in case you want to control few devices with 1 widget. For example, imagine a case when you have 3 smart bulbs and you want to turn on all those bulbs with one single click. You need to assign 3 devices to 1 tag and assign tag to button. That’s it.
Tag widgets also support state syncing. So you can get state of widget from your hardware. However you can’t update state of such widgets from hardware.
Devices online status
Blynk app has support for online statuses for multiple devices.
In ideal world when device closes tcp connection with some connection.close() - connected server will get notification regarding closed connection. So you can get instant status update on UI. However in real world this mostly exceptional situation. In majority of cases there is no easy and instant way to find out that connection is not active anymore.
That’s why Blynk uses HEARTBEAT mechanism. With this approach hardware periodically sends ping command with predefined interval (10 seconds by default, BLYNK_HEARTBEAT property). In case hardware don’t send anything within 10 seconds server waits additional 5 seconds and after that connection assumed to be broken and closed by server. So on UI you’ll see connection status update only after 15 seconds when it is actually happened.
You can also change HEARTBEAT interval from hardware side via Blynk.config. In that case newHeartbeatInterval * 2.3 formula will be applied. So in case you you decided to set HEARTBEAT interval to 5 seconds. You’ll get notification regarding connection with 11 sec delay in worst case.
Project Settings
Every project has it’s own settings:
- Theme - switch between the Light and Black Blynk Theme (Business accounts have wider choice);
- Keep screen always on - allows you to use the Blynk app without going to the sleep mode (usually all mobile devices do that);
- Send app connected command - with this option enabled the server will send “App Connected” and “App Disconnected” commands to your hardware when your Blynk app goes online/offline. Usage example;
- Do not show offline notifications - right now, for debugging purposes, every time your hardware goes offline - the Blynk server will notify you with popup in the app about that. However, when debugging is not needed or the Blynk app is used only via HTTP/S this notifications are meaningless. So this switch allows you to turn off this popups. Also this switch turns off the Push notification “Notify when offline” option.
Change Widget properties
Changing some of the widget properties from hardware side is also supported. For example, you can change the color of LED widget based on a condition:
//change LED color
Blynk.setProperty(V0, "color", "#D3435C");

//change LED label
Blynk.setProperty(V0, "label", "My New Widget Label");

//change MENU labels
Blynk.setProperty(V0, "labels", "Menu Item 1", "Menu Item 2", "Menu Item 3");
Set Property for single value field
Set Property for multi value field
Note
Changing these parameters work only for widgets attached to Virtual pins (analog/digital pins won’t work).
Four widget properties are supported - color, label, min, max for all widgets :
labelis string for label of all widgets.
coloris string in HEX format (in the form: #RRGGBB, where RR (red), GG (green) and BB (blue) are hexadecimal values between 00 and FF). For example :
min,max- minimum and maximum values for the widget (for example range for the Slider). This numbers may be float.On firmware side, widget objects also support
setLabel()andsetColor()functions.
Widget specific properties:
- Button
onLabel/offLabelis string for ON/OFF label of button;
- Styled Button
onLabel/offLabelis string for ON/OFF label of button;onColor/offColoris string in HEX format for ON/OFF colors of the button;onBackColor/offBackColoris string in HEX format for ON/OFF colors of the button background.
- Music Player
isOnPlayis boolean accepts true/false.Blynk.setProperty(V0, "isOnPlay", "true");
- Menu
labelsis list of strings for Menu widget selections;Blynk.setProperty(V0, "labels", "label 1", "label 2", "label 3");
Video Streaming
Blynk.setProperty(V1, "url", "http://my_new_video_url");
Step
Blynk.setProperty(V1, "step", 10);
Image
Blynk.setProperty(V1, "opacity", 50); // 0-100%
Blynk.setProperty(V1, "scale", 30); // 0-100%
Blynk.setProperty(V1, "rotation", 10); //0-360 degrees
also, you can fully replace the list of images from the hardware:
Blynk.setProperty(V1, "urls", "https://image1.jpg", "https://image2.jpg");
or you can change individual image by it index:
Blynk.setProperty(V1, "url", 1, "https://image1.jpg");
You can also change widget properties via HTTP API.
Limitations and Recommendations
Don’t put
Blynk.virtualWriteand any otherBlynk.*command insidevoid loop()- it will cause lot’s of outgoing messages to our server and your connection will be terminated;We recommend calling functions with intervals. For example, use BlynkTimer
Avoid using long delays with
delay()– it may cause connection breaks;If you send more than 100 values per second - you may cause Flood Error and your hardware will be automatically disconnected from the server;
Be careful sending a lot of
Blynk.virtualWritecommands as most hardware is not very powerful (like ESP8266) so it may not handle many requests.